Wednesday, September 21, 2016
Tuesday, June 14, 2016
Free Vehicle, Children & Pet Tracking System
 |
TrackMe is a GPS tracking system designed to track any type of objects but going beyond in ensuring the safety of your beloved ones, finding them whenever you want. Various options are provided free of charge and also at nominal rates.
TrackMe Server
 |
| How Global Positioning System tracking works |
All the tracking devices installed on vehicles will communicate with the TrackMe server. The server has the capability and interfaces to communicate with a variety of devices through SMS and GPRS in synchronization.
The server will maintain a registry of tracking devices set for monitoring.
Glimpse of TrackMe Features
Location Details in real-time
Map devices location through Mobile Apps and Web portal Monitor location of objects in real time, on the map of your choice!
Create Geo-fences and routes
Geofence feature allows users to set up geographic boundaries around areas that needs to be specifically monitored.
Push & Email Notifications
Get instant alerts of predefined events: when object enters or exits geo-zone, speeding, SOS alarms, engine on/off etc.
Monitoring devices simultaneously
Monitoring trough the mobile App. Android, iOS and web portal.
Group monitoring
Possibility of several users monitoring the same module through the web portal or smartphone app.
Restful API
TrackMe provides RESTful API for third party integration.
History & Reports
View past locations
Preview and download reports in different formats (XLS, PDF, CSV, TXT).
Fall detection
Fall detection technology can detect a fall and immediately contact a predefined emergency number, which will send help in a matter of minutes.
Locate mode
Detect the direction and distance to where your vehicle, child, pet or tracking object is.
Find more details about TrackMe Global Positioning System
Tuesday, February 2, 2016
Sanjiva Weerawarana's Blog: Understanding the (Sri Lankan) IT Industry
Sanjiva Weerawarana's Blog: Understanding the (Sri Lankan) IT Industry: In the last 3+ weeks there's been war raging in the IT Crowd in Sri Lanka about the proposed CEPA/ETCA thing : Basically the part of a...
Read more...
Thursday, December 17, 2015
Android, Web, Cloud and Backend and Entrepreneurship Courses
Google and Udacity offer you 31 courses that will make your mouth water and your mind dance. Savor one or several of our 31 self-paced online training courses to indulge your curiosity, expand your knowledge, and hone new skills. Choose from Android, Web, Entrepreneurship, or Cloud and Backend tracks. Are you ready?

Google and Udacity offer you 31 courses
Android
More and more people around the world are embracing mobile at an increasing pace, whether on their phones, in their cars, at home, and around their wrists. Learn to build apps for them!
- Android For Beginners
- Developing Android Apps
- Advanced Android
- Material Design for Android Developers
- Google Location Services on Android
- Analytics & Tag Manager for Android
- Monetize Your Android App with Ads
- Add Google Maps to your Android App
- Add Google Sign-In to your Android Apps
- Android Wear Development
- Android TV and Google Cast Development
- Android Auto Development
- Gradle for Android and Java
- Android Performance
- UX Design for Mobile Developers
Web
Refine your web development skills for mobile. Create fast, fluid user experiences. Deploy for all desktop and mobile devices. Streamline checkout and payment. Learn how to build beautiful, performant, responsive applications for the world’s largest platform.
- Web Tooling and Automation
- Building High Conversion Web Forms
- Browser Rendering Optimization
- Responsive Web Design Fundamentals
- Responsive Images
- Web Performance Optimization
- Mobile Web Development
- HTML5 Game Development
Cloud and Backend
Does your app need to support more users? (Congratulations!) Do you want to move data handling for an existing app from the device to the cloud? Learn how to take advantage of public cloud infrastructure to support millions of users and terabytes of data.
Entrepreneurship
Start the year with a new start up. That says it all. Take these courses to learn how to do it successfully.
And that’s it. 31 courses that will catapult your skills and make 2016 your best year yet! Happy Holidays!
Android, Web, Cloud and Backend and Entrepreneurship Courses
Wednesday, October 14, 2015
Android Studio 1.5 Preview 1 Available
We’ve just released 1.5 Preview 1 to the canary channel!
The memory profiler has a new “analysis” feature where it can analyze a heap dump to look for known problems, such as leaked activities. To use this feature, open a heap dump and look for the Analyzer Tasks window on the right:

Analyzer Tasks window
Android Studio 1.5 Preview 1 Available
Thursday, October 8, 2015
Android app architectures Standard Android MVP and MVVM
Archi
This repository showcases and compares different architectural patterns that can be used to build Android apps. The exact same sample app is built three times using the following approaches:
Standard Android: traditional approach with layouts, Activities/Fragments and Model.
MVP: Model View Presenter.
MVVM: Model View ViewModel with data binding.
The App
The sample app displays a list of GitHub public repositories for a given username. Tapping on one of them will open a repository details screen, where more information about the repo can be found. This screen also shows information about the owner of the repository.

Libraries used
- AppCompat, CardView and RecyclerView
- Data Binding (only MVVM)
- RxJava & RxAndroid
- Retrofit 2
- Picasso
- Mockito
- Robolectric
Standard Android
The /app directoy contains the implementation that follows the traditional standard Android approach. This is a couple of layout files, two Activities and the model. The model is exactly the same for the three implementations and it contains: Repository, User and a retrofit service (GithubService).
With this approach, Activities are in charge of calling the GithubService, processing the data and updating the views. They act kind of like a controller in MVC but with some extra responsibilities that should be part of the view. The problem with this standard architecture is that Activities and Fragments can become quite large and very difficult to tests. Hence why I didn’t write any unit test for this case.
MVP – Model View Presenter
In /app-mvp you will find the sample app implemented following this pattern. When using mvp, Activities and Fragments become part of the view layer and they delegate most of the work to presenters. Each Activity has a matching presenter that handles accessing the model via theGithubService. They also notify the Activities when the data is ready to display. Unit testing presenters becomes very easy by mocking the view layer (Activities).
MVVM – Model View ViewModel
This pattern has recently started to gain popularity due to the release of the data binding library. You will find the implementation in /app-mvvm. In this case, ViewModels retrieve data from the model when requested from the view via data binding. With this pattern, Activities and Fragments become very lightweight. Moreover, writting unit tests becomes easier because the ViewModels are decoupled form the view.
Android app architectures Standard Android MVP and MVVM
Monday, October 5, 2015
Convert Java String to Binary
Convert Java String to Binary
public class CodeSnippets

 public static StringBuilder getBinary(String value)
 byte[] bytes = value.getBytes();
 StringBuilder binary = new StringBuilder();
 for (byte b : bytes)
 int val = b;
 for (int i = 0; i < 8; i++)
 binary.append((val & 128) == 0 ? 0 : 1);
 val <<= 1;


 return binary;
Convert Java String to Binary
Friday, October 2, 2015
Android Studio 1.4
Today we are releasing the 1.4 update to the Android Studio stable release channel. Most of the work and enhancements for Android Studio 1.4 are under the hood. However we have a handful of new features that we hope you enjoy and integrate into your workflow.
Android Studio 1.4
Wednesday, September 30, 2015
Nexus 6P, Nexus 5X and Pixel C Everything you need to know
Nexus 6P, Nexus 5X and Pixel C Everything you need to know
Nexus 6P, Nexus 5X and Pixel C Everything you need to know
How to create anything in Android
Course Summary
Here is one important question Android developers ask while making apps: “How can I do ________ in Android?”
The following are versions of this question that we came across recently:
- How can I add radio buttons to my app?
- How can I play a sound?
- How can I navigate between multiple screens?
This course is a collection of such questions and their answers.
By the end of this course you will have mastered the ability to implement new Android features by reading a blog or article — this is a critical skill possessed by professional Android developers. As a result, you will also be able to use several User Interface components — like Toggle Buttons, Menus, Grid View and many more — that are central to making functional and delightful Android apps.
Start Free Course “How to create in Android”
How to create anything in Android
Tuesday, September 29, 2015
Google Play APK size limit increased to 100MB from 50MB
To support the growing number of developers who are building richer apps and games on Google Play, we are increasing theAPK file size limit to 100MB from 50MB. This means developers can publish APKs up to 100MB in size, and users will see a warning only when the app exceeds the 100MB quota and makes use of Expansion Files. The default update setting for users will continue to be to auto-updating apps over Wi-Fi only, enabling users to access higher quality apps and games while conserving their data usage.
Even though you can make your app bigger, it doesn’t always mean you should. Remember to keep in mind the following factors:
- Mobile data connectivity: Users around the world have varying mobile data connectivity speeds. Particularly in developing countries, many people are coming online with connections slower than those of users in countries like the U.S. and Japan. Users on a slow connection are less likely to install an app or game that is going to take a long time to download.
- Mobile data caps: Many mobile networks around the world give users a limited number of MB that they can download each month without incurring additional charges. Users are often wary of downloading large files for fear of exceeding their limits.
- App performance: Mobile devices have limited RAM and storage space. The larger your app or game, the slower it may run, particularly on older devices.
- Install time: People want to start using your app or game as quickly as possible after tapping the install button. Longer wait times increase the risk they’ll give up.
Google Play APK size limit increased to 100MB from 50MB
Saturday, September 26, 2015
Working with Android image library Picasso
In this quick tip, we take a brief look at the popular Android image library, Picasso. It’s a simple and practical library created and maintained by Square. It is great for working with images in your Android projects.

Working with Android image library Picasso – AndroidCodeGeeks.com
1. Introduction
Picasso is an image library for Android. It’s created and maintained by Square, and caters to image loading and processing. It simplifies the process of displaying images from external locations. In many cases only a few lines of code is required to implement this neat library.
Picasso shines for displaying remote images. The library handles every stage of the process, from the initial HTTP request to the caching of the image. This can be quite verbose when writing code to perform these actions yourself. In this quick tip, we look at a few common use cases.
2. Installation
Start by downloading the JAR file from Picasso’s website. Installing is done the usual manner. If you need help with this step, then take a look at this tutorial by Shane Condor and Lauren Darcey.
If you’re using Android Studio, then you can add
compile 'com.squareup.picasso:picasso:2.3.3'
to the build.gradle file in the dependency section.
3. Hands-On
Step 1: Create a new project
Create a new project in your IDE of choice. Make sure to select a blank Activity if you’re using Android Studio.
Step 2: Image Widget
Open the layout file for the main Activity. We need to add an ImageView to the layout. It doesn’t need to be fancy. The following code snippet shows you what I mean.
<ImageView
 android:layout_width="wrap_content"
 android:layout_height="wrap_content"
 android:id="@+id/imageView"
 android:layout_alignParentTop="true"
 android:layout_centerHorizontal="true" />
Step 3: Add Picasso
Navigate to the main Activity file. Add the following code block to the onCreate method.
ImageView imageView = (ImageView) findViewById(R.id.imageView);
Picasso.with(this)
.load("https://cms-assets.tutsplus.com/uploads/users/21/posts/19431/featured_image/CodeFeature.jpg")
.into(imageView);
In the first line, we get a reference to the ImageView instance in the layout file. We then load an image into the image view using the Picasso library. We first specify the context by calling with and passing in the context. We then call the load method and supply it with the location of the image, a URL in this case. Finally, we tell Picasso where it should display the image when it’s fetched by calling into and pass in the imageView object.
Your IDE will ask you to import the Picasso library. However, to do this manually add the following import statement at the top of the Activity class.
import com.squareup.picasso.Picasso;Step 4: Permissions
For Picasso to do its work, make sure to add <uses-permission android:name="android.permission.INTERNET" /> to your project’s manifest.
Step 5: Build and Run
That’s pretty much it. If you build and run the application, you should see the image load on the screen.
4. More Examples
Picasso has much more tricks up its sleeve. In the following example, we use Picasso to fetch a remote image and resize it before displaying it in an image view.
Picasso.with(this)
 .load(https://cms-assets.tutsplus.com/uploads/users/21/posts/19431/featured_image/CodeFeature.jpg)
 .resize(100, 100)
 .into(imageView)
Picasso also supports transformations, such as rotation. In the next code snippet, we fetch a remote image and rotate it 180 degrees before displaying it in an image view.
Picasso.with(this)
 .load("https://cms-assets.tutsplus.com/uploads/users/21/posts/19431/featured_image/CodeFeature.jpg")
 .rotate(180)
 .into(imageView);
If your application relies on remote assets, then it’s important to add a fallback in the form of a placeholder image. The placeholder image is shown immediately and replaced by the remote image when Picasso has finished fetching it.
Picasso.with(this)
 .load(https://cms-assets.tutsplus.com/uploads/users/21/posts/19431/featured_image/CodeFeature.jpg)
 .placeholder(R.drawable.image_name)
 .into(imageView);
Picasso supports two types of placeholder images. We already saw how theplaceholder method works, but there’s also an error method that accepts a placeholder image. Picasso will try to download the remote image three times and display the error placeholder image if it was unable to fetch the remote asset.
Picasso.with(this)
 .load(https://cms-assets.tutsplus.com/uploads/users/21/posts/19431/featured_image/CodeFeature.jpg)
 .error(R.drawable.image_name)
 .into(imageView);
Note that you can combine the placeholder and error methods as shown in the following code block.
Picasso.with(this)
 .load(https://cms-assets.tutsplus.com/uploads/users/21/posts/19431/featured_image/CodeFeature.jpg)
 .placeholder(R.drawable.image_name_default)
 .error(R.drawable.image_name_error)
 .into(imageView);
Conclusion
With Picasso being so simple to use, it’s definitely worth thirty minutes of your time. If you’re creating an app that frequently loads images, then Picasso could well make your life that little bit simpler.
Working with Android image library Picasso
Sunday, September 20, 2015
Google Maps Android API Lite Mode Example
Lite Mode
The Google Maps Android API can serve a static image as a ‘lite mode’ map.
Overview of lite mode
A lite mode map is a bitmap image of a map at a specified location and zoom level. Lite mode supports all of the map types (normal, hybrid, satellite, terrain) and a subset of the functionality supplied by the full API. Lite mode is useful when you want to provide a number of maps in a stream, or a map that is too small to support meaningful interaction.
Users viewing the map cannot zoom or pan the map. Icons on the map give users access to viewing the map in the Google Maps mobile app and requesting directions.
Find Google Maps Android API Lite Mode Example on GitHub
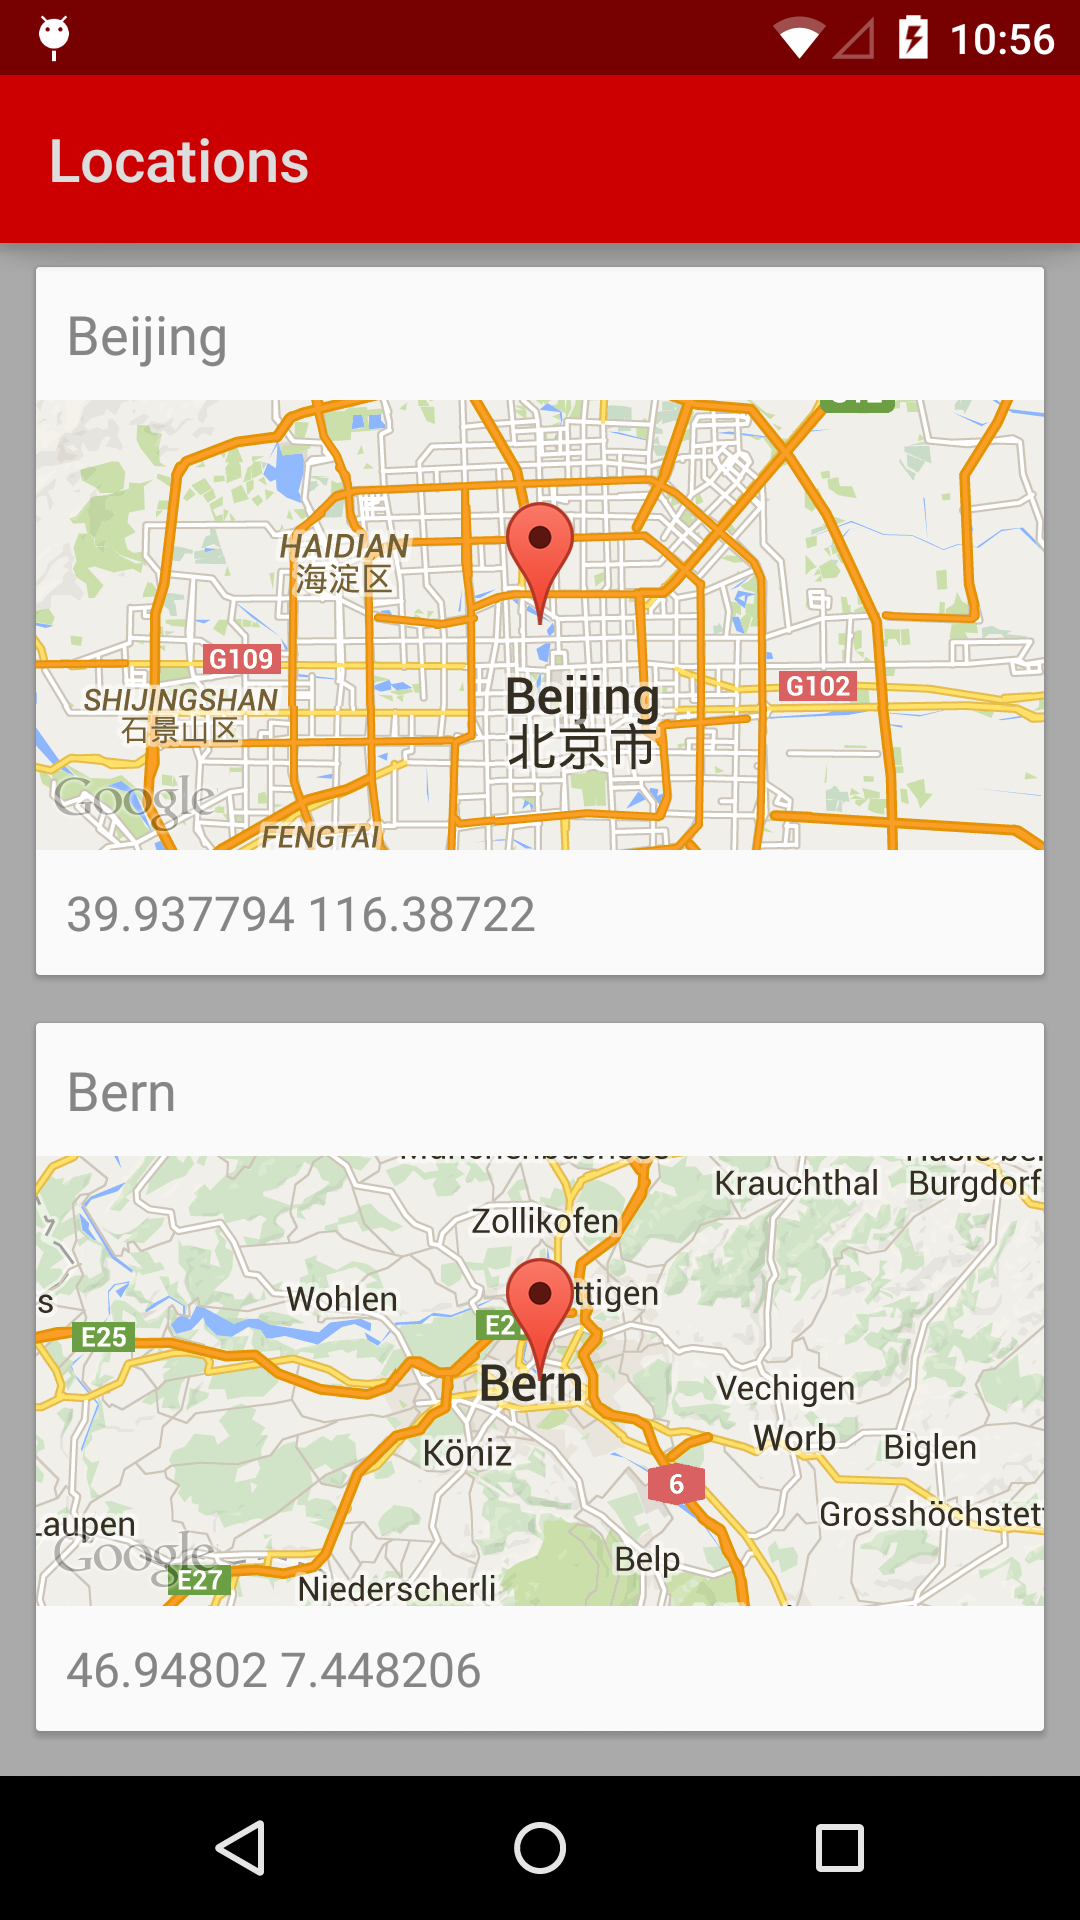
Google Maps API “Lite Mode”
Google Maps Android API Lite Mode Example
Friday, September 18, 2015
Material Design Snackbar using the design support library

A Snackbar is a lightweight material design method for providing feedback to a user, while optionally providing an action to the user. They are displayed on the screen until a specified interval has passed, the user swipes to dismiss them, or when the user interacts with another part of the screen. Think of it as a modern take on the Android Toast.
This week at Google I/O 2015 the Android Design Support Library was released including a Snackbar implementation. Before now implementing and following the material guidelines for a Snackbar was left to the developer. A few third party libraries were released to make developers lives easier, but now official support for Snackbar has been introduced to make it easier than ever to add a Snackbar to your Android app.
Source: Material Design Snackbar using the design support library
Material Design Snackbar using the design support library
Thursday, July 16, 2015
AndroidCodeGeeks | The Android Knowledge Base

Android Code Geeks is knowledge base which maintain categorize android tutorials which will help android developers to find the best articles,videos and examples.
Website : AndroidCodeGeeks.com
Twitter : @AndroidCodeGeek
FB : AndroidCodeGeeks on Facebook
Thursday, January 29, 2015
Android-Libs.com for Android Developers
Android developers gain a lot of advantages from working on a platform with a wide variety of libraries, open source projects, and other resources to help get their work to the finish line. Unfortunately, if a problem can’t be solved by checking out the SDK samples or reading a few dozen StackOverflow questions, it can be pretty hard to find good alternatives when they are most needed. Before giving up on the tricky problems, or possibly before attempting them, check out Android-Libs.com – a registry of open source code, libraries, handy websites, utilities, and other tools that may be useful to Android developers of all types.
Most entries link back to Github project pages with embedded counters for the number of open issues, forks, watchers, and stars. Beyond these statistics, most resources also include a short description, minimum API level (if relevant), a screenshot, a Gradle compile line to include libraries, and a few other details. Finally, everything has been sorted into a pretty lengthy list of categories for easy browsing, and there is a search box that queries project titles and descriptions.
If you’re looking for a library or shortcut to get a certain feature working right out of the gate, or trying to find a good solution after spending hours running into a wall, take a look at Android-Libs. It’s always great to see another helpful resource for the Android development community. The site is even open source on Github, in case there is something useful to learn from checking out the code.
The registry is updated regularly, but most of the activity is also published to an RSS feed and a custom PushBullet channel, so it's easy to see when new additions make it to the list. It's definitely worth checking out Android-Libs.com and bookmarking it for the future.
Saturday, March 8, 2014
Android Libs Org

Android Libs Org
Android Libs Org | Android Libs Org is a place to gather all open source Android UI Views, Android Libraries, Android Tools and Plugins
Android Libs Org will help you to find the UI Views, Libraries, Tools and Plugins.
If you found a good Android Library do not forget to contact Android Libs Org and let them know to update it.

If you found a good Android Library do not forget to contact Android Libs Org and let them know to update it.
Contribute to AndroidLibs.Org
Friday, January 10, 2014
Android ScrollView with GestureDetector
The implementation of Android GestureDetector with ScrollView

ScrollLayoutActivity
import android.os.Bundle;
import android.app.Activity;
import android.util.DisplayMetrics;
import android.util.Log;
import android.view.GestureDetector;
import android.view.GestureDetector.SimpleOnGestureListener;
import android.view.MotionEvent;
import android.widget.LinearLayout;
import android.widget.ScrollView;
import android.widget.Toast;

public class ScrollLayoutActivity extends Activity {

 private static String TAG = ScrollLayoutActivity.class.getSimpleName();

 private LinearLayout mTopLayout;
 private LinearLayout mMiddleLayout;
 private LinearLayout mBottomLayout;

 private ScrollView mScrollView;

 private boolean possitionTop;
 private boolean possitionMiddle = true;

 int mLayoutHeight;
 float mDeviceHeight;

 @Override
 protected void onCreate(Bundle savedInstanceState) {
  super.onCreate(savedInstanceState);
  setContentView(R.layout.activity_testlayouts);

  DisplayMetrics displayMetrics = new DisplayMetrics();
  getWindowManager().getDefaultDisplay().getMetrics(displayMetrics);

  // final float height=displayMetrics.heightPixels/displayMetrics.xdpi;

  // device height in pixels
  mDeviceHeight = displayMetrics.heightPixels;
  mLayoutHeight = (int) mDeviceHeight / 3;

  mScrollView = (ScrollView) findViewById(R.id.scrv);

  mTopLayout = (LinearLayout) findViewById(R.id.top);
  mMiddleLayout = (LinearLayout) findViewById(R.id.middle);
  mBottomLayout = (LinearLayout) findViewById(R.id.bottom);

  mTopLayout.setLayoutParams(new LinearLayout.LayoutParams(mTopLayout
    .getLayoutParams().width, mLayoutHeight));
  mBottomLayout.setLayoutParams(new LinearLayout.LayoutParams(
    mBottomLayout.getLayoutParams().width, mLayoutHeight));
  mMiddleLayout.setLayoutParams(new LinearLayout.LayoutParams(
    mMiddleLayout.getLayoutParams().width, (int) mDeviceHeight));

  mScrollView.setHorizontalFadingEdgeEnabled(false);
  mScrollView.setVerticalFadingEdgeEnabled(false);
  mScrollView.post(new Runnable() {
   public void run() {
    mScrollView.scrollTo(0, mLayoutHeight);
   }
  });

  // findViewById(R.id.button).setOnClickListener(new
  // View.OnClickListener() {
  //
  // @Override
  // public void onClick(View v) {
  // Toast.makeText(ScrollLayoutActivity.this, "height : " +
  // mDeviceHeight, Toast.LENGTH_SHORT).show();
  // }
  // });

  Toast.makeText(this, "Device Height : " + mDeviceHeight,
    Toast.LENGTH_SHORT).show();

 }

 public boolean dispatchTouchEvent(MotionEvent ev) {
  return mGestureDetector.onTouchEvent(ev);
 }

 SimpleOnGestureListener simpleOnGestureListener = new SimpleOnGestureListener() {
  @Override
  public boolean onFling(MotionEvent e1, MotionEvent e2, float velocityX,
    float velocityY) {
   String swipe = "";
   float sensitvity = 100;

   if ((e1.getX() - e2.getX()) > sensitvity) {
    swipe += "Swipe Left\n";
   } else if ((e2.getX() - e1.getX()) > sensitvity) {
    swipe += "Swipe Right\n";
   } else {
    swipe += "\n";
   }

   if ((e1.getY() - e2.getY()) > sensitvity) {
    swipe += "Swipe Up\n";
    if (!possitionMiddle && possitionTop) {
     mScrollView.scrollBy(0, mLayoutHeight);
     possitionTop = false;
     possitionMiddle = true;
    } else if (possitionMiddle && !possitionTop) {
     mScrollView.fullScroll(ScrollView.FOCUS_DOWN);
     possitionTop = false;
     possitionMiddle = false;
    }
   } else if ((e2.getY() - e1.getY()) > sensitvity) {
    swipe += "Swipe Down\n";
    if (possitionMiddle && !possitionTop) {
     mScrollView.fullScroll(ScrollView.FOCUS_UP);
     possitionTop = true;
     possitionMiddle = false;
    }
    if (!possitionMiddle && !possitionTop) {
     mScrollView
       .scrollTo(mScrollView.getBottom(), mLayoutHeight);
     possitionTop = false;
     possitionMiddle = true;
    }
   } else {
    swipe += "\n";
   }
   Log.d(TAG, swipe);
   return super.onFling(e1, e2, velocityX, velocityY);
  }

 };

 GestureDetector mGestureDetector = new GestureDetector(
   simpleOnGestureListener);
}
activity_scroll_layout.xml
<?xml version="1.0" encoding="utf-8"?>
<ScrollView xmlns:android="http://schemas.android.com/apk/res/android"
    android:id="@+id/scrv"
    android:layout_width="match_parent"
    android:layout_height="fill_parent"
    android:fillViewport="true"
    android:scrollbars="none" >

    <LinearLayout
        android:id="@+id/container2"
        android:layout_width="match_parent"
        android:layout_height="fill_parent"
        android:background="#1E1E1E"
        android:baselineAligned="false"
        android:orientation="vertical" >

        <LinearLayout
            android:id="@+id/top"
            android:layout_width="match_parent"
            android:layout_height="100dp"
            android:background="@android:color/black"
            android:baselineAligned="false"
            android:orientation="vertical" >
        </LinearLayout>

        <LinearLayout
            android:id="@+id/middle"
            android:layout_width="match_parent"
            android:layout_height="100dp"
            android:background="@android:color/white"
            android:baselineAligned="false"
            android:orientation="vertical" >

            <Button
                android:id="@+id/button"
                style="?android:attr/buttonStyleSmall"
                android:layout_width="wrap_content"
                android:layout_height="wrap_content"
                android:text="Button" />
        </LinearLayout>

        <LinearLayout
            android:id="@+id/bottom"
            android:layout_width="match_parent"
            android:layout_height="200dp"
            android:background="@android:color/darker_gray"
            android:baselineAligned="false"
            android:orientation="vertical" >
        </LinearLayout>
    </LinearLayout>

</ScrollView>
Tuesday, December 10, 2013
Sith Browser
Sinhala Android web Browser | Tamil Android web Browser

Sith Browser is light weight fast Android web Browser (Sinhala Android web browser / Tamil Android web Browser). Happy Browsing
★ Sinhala web Browser
★ Tamil web Browser
★ Tamil web Browser
Features:
- Unlimited Tabs
- Full Screen Mode
- Incognito Browsing (Incognito Mode keeps you safe while browsing,History is not saved, Cookies are disabled, and Location access is disabled to ensure as best we can that you are not being tracked )
- Bookmarks
- History
- Block Images
- Flash Support
- Fast Sinhala and Tamil Rendering
- Search Engine
- FREE No Ads
- Full Screen Mode
- Incognito Browsing (Incognito Mode keeps you safe while browsing,History is not saved, Cookies are disabled, and Location access is disabled to ensure as best we can that you are not being tracked )
- Bookmarks
- History
- Block Images
- Flash Support
- Fast Sinhala and Tamil Rendering
- Search Engine
- FREE No Ads
Download Sith Browser and enjoy a faster experience with Sinhala Tamil web browsing.


Friday, September 6, 2013
Android Swipe List View
SwipeListView
An Android List View implementation with support for drawable cells and many other swipe related features. on Android for @ 47 Degrees
Fork source code from githon Android for @ 47 Degreesub
Subscribe to:
Posts (Atom)
 Facebook


