Monday, May 14, 2012

Send Email in Java Mail API using Gmail SMTP Server

7 comments
To send email using java you must have mail server and user name and password to access the mail server. In this tutorial I used gmail SMTP server with SSL connection. You must add Java Mail API to your class path.


package jsupport.mail;

import java.util.Properties;
import javax.mail.Authenticator;
import javax.mail.Message;
import javax.mail.Message.RecipientType;
import javax.mail.MessagingException;
import javax.mail.PasswordAuthentication;
import javax.mail.Session;
import javax.mail.Transport;
import javax.mail.internet.InternetAddress;
import javax.mail.internet.MimeMessage;

/**
 *
 * @author Java Srilankan Support - JSupport
 */
public class SendMail {
    
    public void sendMail(String m_from,String m_to,String m_subject,String m_body){

      try {

            m_properties     = new Properties();
            m_properties.put("mail.smtp.host", "smtp.gmail.com"); 
            m_properties.put("mail.smtp.socketFactory.port", "465");
            m_properties.put("mail.smtp.socketFactory.class","javax.net.ssl.SSLSocketFactory");
            m_properties.put("mail.smtp.auth", "true");
            m_properties.put("mail.smtp.port", "465");
            

            m_Session        =   Session.getDefaultInstance(m_properties,new Authenticator() {
                protected PasswordAuthentication getPasswordAuthentication() {
                    return new PasswordAuthentication("username","password"); // username and the password
                }

            });
            
            m_simpleMessage  =   new MimeMessage(m_Session);

            m_fromAddress    =   new InternetAddress(m_from);
            m_toAddress      =   new InternetAddress(m_to);


            m_simpleMessage.setFrom(m_fromAddress);
            m_simpleMessage.setRecipient(RecipientType.TO, m_toAddress);
            m_simpleMessage.setSubject(m_subject);
            m_simpleMessage.setContent(m_body,"text/plain");

            Transport.send(m_simpleMessage);

        } catch (MessagingException ex) {
            ex.printStackTrace();
        }
    }

    public static void main(String[] args) {

      SendMail send_mail    =   new SendMail();
      send_mail.sendMail("from-mail@gmail.com", "to-mail@gmail.com", "Test Mail", "Hi this is Test mail from Java Srilankan Support");
    }

    private Session m_Session;
    private Message m_simpleMessage;
    private InternetAddress m_fromAddress;
    private InternetAddress m_toAddress;
    private Properties m_properties;
}
Read more...

Android ListView example with Image and Text

36 comments

Android ListView


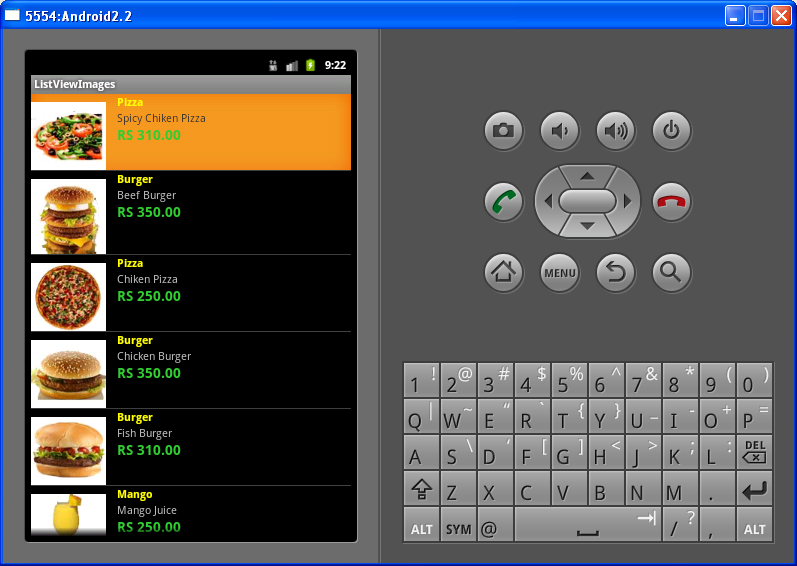
This tutorial I am going to show you how to create Android ListView with images and text. you will be find how to load image from the resources and how to set text to TextView. Here is the screen shot of ListView.


Android List View Example


Android List View example on Samsung Galaxy Y s5360

Android List View example on Samsung Galaxy Y s5360.jpg


ItemDetails class, which is help to set item data and you will be get data from the ItemDetails


package com.jsupport.listviewimages;

public class ItemDetails {

public String getName() {
return name;
}
public void setName(String name) {
this.name = name;
}
public String getItemDescription() {
return itemDescription;
}
public void setItemDescription(String itemDescription) {
this.itemDescription = itemDescription;
}
public String getPrice() {
return price;
}
public void setPrice(String price) {
this.price = price;
}
public int getImageNumber() {
return imageNumber;
}
public void setImageNumber(int imageNumber) {
this.imageNumber = imageNumber;
}

private String name ;
private String itemDescription;
private String price;
private int imageNumber;


}


ItemListBaseAdapter


which is extend from the BaseAdapter and set item details and the image 


package com.jsupport.listviewimages;

import java.util.ArrayList;


import android.content.Context;
import android.view.LayoutInflater;
import android.view.View;
import android.view.ViewGroup;
import android.widget.BaseAdapter;
import android.widget.ImageView;
import android.widget.TextView;

public class ItemListBaseAdapter extends BaseAdapter {
 private static ArrayList<ItemDetails> itemDetailsrrayList;
 
 private Integer[] imgid = {
   R.drawable.p1,
   R.drawable.bb2,
   R.drawable.p2,
   R.drawable.bb5,
   R.drawable.bb6,
   R.drawable.d1
   };
 
 private LayoutInflater l_Inflater;

 public ItemListBaseAdapter(Context context, ArrayList<ItemDetails> results) {
  itemDetailsrrayList = results;
  l_Inflater = LayoutInflater.from(context);
 }

 public int getCount() {
  return itemDetailsrrayList.size();
 }

 public Object getItem(int position) {
  return itemDetailsrrayList.get(position);
 }

 public long getItemId(int position) {
  return position;
 }

 public View getView(int position, View convertView, ViewGroup parent) {
  ViewHolder holder;
  if (convertView == null) {
   convertView = l_Inflater.inflate(R.layout.item_details_view, null);
   holder = new ViewHolder();
   holder.txt_itemName = (TextView) convertView.findViewById(R.id.name);
   holder.txt_itemDescription = (TextView) convertView.findViewById(R.id.itemDescription);
   holder.txt_itemPrice = (TextView) convertView.findViewById(R.id.price);
   holder.itemImage = (ImageView) convertView.findViewById(R.id.photo);

   convertView.setTag(holder);
  } else {
   holder = (ViewHolder) convertView.getTag();
  }
  
  holder.txt_itemName.setText(itemDetailsrrayList.get(position).getName());
  holder.txt_itemDescription.setText(itemDetailsrrayList.get(position).getItemDescription());
  holder.txt_itemPrice.setText(itemDetailsrrayList.get(position).getPrice());
  holder.itemImage.setImageResource(imgid[itemDetailsrrayList.get(position).getImageNumber() - 1]);

  return convertView;
 }

 static class ViewHolder {
  TextView txt_itemName;
  TextView txt_itemDescription;
  TextView txt_itemPrice;
  ImageView itemImage;
 }
}


ListViewImagesActivity


package com.jsupport.listviewimages;

import java.util.ArrayList;

import android.app.Activity;
import android.os.Bundle;
import android.view.View;
import android.widget.AdapterView;
import android.widget.ListView;
import android.widget.Toast;
import android.widget.AdapterView.OnItemClickListener;

public class ListViewImagesActivity extends Activity {
/** Called when the activity is first created. */
@Override
public void onCreate(Bundle savedInstanceState) {
super.onCreate(savedInstanceState);
setContentView(R.layout.main);

ArrayList<ItemDetails> image_details = GetSearchResults();

final ListView lv1 = (ListView) findViewById(R.id.listV_main);
lv1.setAdapter(new ItemListBaseAdapter(this, image_details));

lv1.setOnItemClickListener(new OnItemClickListener() {
@Override
public void onItemClick(AdapterView<?> a, View v, int position, long id) {
Object o = lv1.getItemAtPosition(position);
ItemDetails obj_itemDetails = (ItemDetails)o;
Toast.makeText(ListViewImagesActivity.this, "You have chosen : " + " " + obj_itemDetails.getName(), Toast.LENGTH_LONG).show();
} 
});
}

private ArrayList<ItemDetails> GetSearchResults(){
ArrayList<ItemDetails> results = new ArrayList<ItemDetails>();

ItemDetails item_details = new ItemDetails();
item_details.setName("Pizza");
item_details.setItemDescription("Spicy Chiken Pizza");
item_details.setPrice("RS 310.00");
item_details.setImageNumber(1);
results.add(item_details);

item_details = new ItemDetails();
item_details.setName("Burger");
item_details.setItemDescription("Beef Burger");
item_details.setPrice("RS 350.00");
item_details.setImageNumber(2);
results.add(item_details);

item_details = new ItemDetails();
item_details.setName("Pizza");
item_details.setItemDescription("Chiken Pizza");
item_details.setPrice("RS 250.00");
item_details.setImageNumber(3);
results.add(item_details);

item_details = new ItemDetails();
item_details.setName("Burger");
item_details.setItemDescription("Chicken Burger");
item_details.setPrice("RS 350.00");
item_details.setImageNumber(4);
results.add(item_details);

item_details = new ItemDetails();
item_details.setName("Burger");
item_details.setItemDescription("Fish Burger");
item_details.setPrice("RS 310.00");
item_details.setImageNumber(5);
results.add(item_details);

item_details = new ItemDetails();
item_details.setName("Mango");
item_details.setItemDescription("Mango Juice");
item_details.setPrice("RS 250.00");
item_details.setImageNumber(6);
results.add(item_details);


return results;
}
}

Download complete project here Android ListView


Read more...

Friday, April 20, 2012

First Android Application in Eclipse Hello world Android Example

0 comments
Android hello world example


In this tutorial, I am going show you how to create your very first Android Application.First of all you need to Setup Android Development Environment, visit How to setup Android Development Environment in With Eclipse, to setup your How to setup android development environment.


Create Android Project


Start Eclipse, File -> New -> Android Project and input Application name, Build Target which is your android OS platform and the Package name under properties and finish.Eclipse will create all unnecessary configuration and files to your project application.


New Android Project
First Android Project


Modify the Activity class


Find the activity class FirstAndroidAppActivity.java under src, and modify as bellow


package com.firstapp;

import android.app.Activity;
import android.os.Bundle;
import android.widget.TextView;

public class FirstAndroidAppActivity extends Activity {

/** Called when the activity is first created. */
@Override
public void onCreate(Bundle savedInstanceState) {
super.onCreate(savedInstanceState);
TextView text = new TextView(this);
text.setText("Hello Java Srilankan Support");
setContentView(R.layout.main);
}
}

Run as Android Application

You will see "Hello Java Srilankan Support" on the virtual device (AVD)


Run as Android Application


Android Virtual Device (AVD)


In home you will be see your FirstAndroidApp


Read more...

Wednesday, April 4, 2012

How To Setup Android Application Development Environment

29 comments
Android Development Environment in Eclipse

It is very easy to set up Android Development Environment on Eclipse. First of all you need to download the tools and software. You must download followings

  • Java SE Development Kite (JDK 5 or newer)
  • Eclipse IDE for Java Developer
  • Android Software Development Kit

Setup Java

To setup java in your computer you must download java from the oracle site here is the download link
http://www.oracle.com/technetwork/java/javase/downloads/index.html


Oracle Java Development kit JDK 7


Java SE Development Kite 7 and then select Accept License Agreement and select your windows platform also


Download Oracle Java


Oracle Java Development kit JDK 7


You are not require to do any changes when you are going to install JDK, just install it in normal way.


Setup Eclipse IDE

Download Eclipse IDE for Java Developer from the eclipse.org and extract the downloaded file.
Eclipse is not require to installation, just run the Eclipse.exe


Download Eclipse IDE for Java Developer


Setup Android Software Development Kit (SDK)

Download Android SDK from http://developer.android.com/sdk/index.html and extract the downloaded file and run the SDK Manager


Download Android Software Development kit


Install Android Software Development kit


  • Select Available packages from the left pane and then select any android sdk platform you wish to develop from the right pane, it will take time to complete.
  • Click Install Selected


Download Available Android Software Development kit packeges


  • In the popup select Accept All and Click Install


Install Available Android SDK packeges


Create Android Virtual Device (AVD) on Android SDK

After installation complete select Virtual Device in the left pane and then click NEW in right pane.


Create Android Virtual Device on Android SDK


  • Enter a name to your Android Virtual Device
  • Select target Android version from the Target drop down box
  • Give the size of SD card and then click Create AVD
  • It will take time to create Android Virtual Device (AVD)


Create New Android Virtual Device  on Android SDK


Configure Installed Android with Eclipse


Run the Eclipse ......

  • First run of Eclipse it will ask the default workplace, you must be mention the default workplace folder
  • Go to the Help -- Install New Software

Add Android to Eclipse


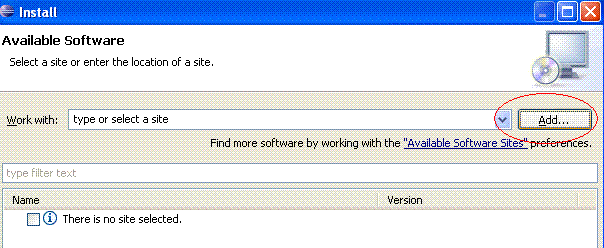
  • Click Add button in install window to install Android Developer Tool

Add Android to Eclipse 2


  • Name it as Android
  • Add Location as http://dl-ssl.google.com/android/eclipse/ and do OK
Developer Tool of Android on Eclipse


  • After click OK, in the next popup box Select Developer Tools and click Next and accept license agreement and finish it


  • Eclipse IDE will gives you a warning message saying Your installation software that contains unsigned content ...... just OK and restart your Eclipse IDE

  • Eclipse Warning

Restart Eclipse


  • Now you need to give the Android SDK location to the popup which will be display when Eclipse IDE restart
  • When the Eclipse IDE starts there will be a configuration popup which will ask the Android SDK location
  • Select Use existing SDK and then browse the Android SDK location and finish
Add Android SDK location to Eclipse


Now your Android development Environment is ready for development. Start your First Android Application in Eclipse Hello world Android Example

Read more...

Saturday, March 24, 2012

How To Validate Email Address in Java Mail API

1 comments

Validate Email Address using Java Mail API


In this tutorial you will find how to validate email address using java Mail API. You must to import javax.mail.internet.InternetAddress 


package jsupport;

import javax.mail.internet.AddressException;
import javax.mail.internet.InternetAddress;

/**
 *
 * @author Jsupport http://javasrilankansupport.blogspot.com
 */
public class ValidateEmailAddress {

    public static  boolean  validateEmail(String email) {
        try {
            new InternetAddress(email).validate();

        } catch (AddressException ex) {
            System.out.println("Error : " + ex.getMessage());
            return false;
        }
        return true;
    }

    public static void main(String[] args) {

        validateEmail("info@jsupport.com");

    }
}

Read more...

Thursday, March 22, 2012

How to Create Directory in Java,Directory Creation in Java

0 comments

Java Create Directory - Java Tutorial


In this Tutorial you will learn how to create directory and check whether that directory is exist.If the directory is exist then it will not create otherwise,


import java.io.File;

/**
 *
 * @author JSupport http://javasrilankansupport.blogspot.com
 */
public class CreateDirectory {

    public static void main(String[] args) {

        String directory = "JAVADIR";
        String directory_tree = "JSUPPORT/JAVA";
        boolean dir_exist = false;

        try {
            // Check whether the derectory is exist
            dir_exist = new File(directory).isDirectory();

            if (dir_exist) {
                System.out.println("directory already created.....");
            } else {
                // creat directory
                new File(directory).mkdir();
            }

            // Check whether the derectory is exist
            dir_exist = new File(directory_tree).isDirectory();

            if (dir_exist) {
                System.out.println("directories already created.....");
            } else {
                // create directories
                new File(directory_tree).mkdirs();
            }

        } catch (Exception e) {
            System.out.println("Error : "+e.getMessage());
        }

    }
}

Read more...

How to Write a File in Java,Java Write to File Example,Write a File in Java

0 comments

Java a Write file  - Java Tutorial

In this Tutorial you will learn how to write a file,It use FileWriter class and BufferedWriter class to write the file.


import java.io.BufferedWriter;
import java.io.FileWriter;
import java.io.IOException;

/**
 *
 * @author JSupport http://javasrilankansupport.blogspot.com
 */
public class WriteFile {


    public static void writToFile(String data){

        try {

            // Create a new file  TEST.txt
            FileWriter file_writer  = new FileWriter("TEST.txt");
            BufferedWriter bufferd_writer   =   new BufferedWriter(file_writer);

            // write data to file
            bufferd_writer.write(data);
            // flush and close the file
            bufferd_writer.flush();
            bufferd_writer.close();

        } catch (IOException ex) {
            System.out.println("Cannot write    :" + ex.getMessage());
        }
    }

    public static void main(String[] args) {
        writToFile("Hello Java Sri Lankan Support");
    }
}

Read more...

Wednesday, March 21, 2012

How To Get Date Range in Java Calendar's set() add() and roll()

0 comments

 Calendar (Java 2 Platform SE 5.0) set() add()  and roll() 


import java.text.SimpleDateFormat;
import java.util.Calendar;
import java.util.Date;

/**
 *
 * @author JSupport http://javasrilankansupport.blogspot.com
 */

enum DateEnum {
    DAILY,
    WEEKLY,
    MONTHLY;
}

public class DateRange {

    public int x = 2;
    public String date,stdate,endate;

    private String getDateTime(DateEnum type) {

        Calendar c = Calendar.getInstance();
        SimpleDateFormat sdf = new SimpleDateFormat("dd/MM/yyyy");
        Date d = c.getTime();
        
        c.setTime(d);

        switch (type) {

            case DAILY:
                c.roll(Calendar.DAY_OF_WEEK, -1);
                date = sdf.format(c.getTime());
                break;
            case WEEKLY:
                 c.roll(Calendar.DAY_OF_WEEK, -1);
                 stdate = sdf.format(c.getTime());
                 c.roll(Calendar.WEEK_OF_MONTH,-1);
                 endate = sdf.format(c.getTime());
                 date = stdate+","+endate;
                break;

            case MONTHLY:
                 c.roll(Calendar.DAY_OF_WEEK, -1);
                 stdate = sdf.format(c.getTime());
                 c.roll(Calendar.MONTH,-1);
                 endate = sdf.format(c.getTime());
                 date = stdate+","+endate;
                break;
        }
        return date;
    }

    public static void main(String[] arr) {

        DateRange dr = new DateRange();

        System.out.println(dr.getDateTime(DateEnum.DAILY));
        System.out.println(dr.getDateTime(DateEnum.WEEKLY));
        System.out.print(dr.getDateTime(DateEnum.MONTHLY));

    }
}

Read more...

Wednesday, March 14, 2012

Insert and Retrieve Values from a Map (HashMap)

0 comments
  • Insert values into HashMap
  • Retrieve values from HashMap

import java.util.HashMap;
import java.util.Iterator;
import java.util.Map;
import java.util.Set;

/**
*
* @author JSupport
* http://javasrilankansupport.blogspot.com
*
*/

public class InsertRetrieveDataFromMap {

// get values from HashMap
public static void getHashMapData(Map order_details){
Set key_set;

// gat all key to Set
key_set     =   order_details.keySet();

for (Iterator it = key_set.iterator(); it.hasNext();) {

String key      =   (String) it.next();
String  value   =   (String) order_details.get(key);

System.out.println("Map key : "+key +"\tKey Value : "+key);
}

}
public static void main(String[] args) {

HashMap order_details   =   new HashMap();

//     add key value pairs to HashMap

order_details.put("kitchName", "Chinese Kitchen");
order_details.put("waiterName", "Silva");
order_details.put("tableName", "20");

getHashMapData(order_details);
}
}


This program dose answer to following....
  • How to Insert values into HashMap in Java
  • How to Insert values into HashMap in Java
  • How to Retrieve values from HashMap in Java
  • How to Retrieve values from Map in Java
Read more...

Thursday, March 8, 2012

Get Available COM Ports in Java Comm

0 comments
First of all you must properly install Java Comm API.There is nothing much more


package jsupport.com;

import gnu.io.CommPortIdentifier;
import java.util.Enumeration;

/**
 *
 * @author JSupport
 */
public class GetAvailableComPorts {

    public static void getComPorts(){
        String     port_type;
        Enumeration  enu_ports  = CommPortIdentifier.getPortIdentifiers();

        while (enu_ports.hasMoreElements()) {
            CommPortIdentifier port_identifier = (CommPortIdentifier) enu_ports.nextElement();

            switch(port_identifier.getPortType()){
                case CommPortIdentifier.PORT_SERIAL:
                    port_type   =   "Serial";
                    break;
                case CommPortIdentifier.PORT_PARALLEL:
                    port_type   =   "Parallel";
                    break;
                case CommPortIdentifier.PORT_I2C:
                    port_type   =   "I2C";
                    break;
                case CommPortIdentifier.PORT_RAW:
                    port_type   =   "Raw";
                    break;
                case CommPortIdentifier.PORT_RS485:
                    port_type   =   "RS485";
                    break;
                default:
                    port_type   =   "Unknown";
                    break;
            }

            System.out.println("Port : "+port_identifier.getName() +" Port type : "+port_type);
        }
    }
    public static void main(String[] args) {
        getComPorts();
    }
}

Read more...