Friday, April 20, 2012

First Android Application in Eclipse Hello world Android Example

0 comments
Android hello world example


In this tutorial, I am going show you how to create your very first Android Application.First of all you need to Setup Android Development Environment, visit How to setup Android Development Environment in With Eclipse, to setup your How to setup android development environment.


Create Android Project


Start Eclipse, File -> New -> Android Project and input Application name, Build Target which is your android OS platform and the Package name under properties and finish.Eclipse will create all unnecessary configuration and files to your project application.


New Android Project
First Android Project


Modify the Activity class


Find the activity class FirstAndroidAppActivity.java under src, and modify as bellow


package com.firstapp;

import android.app.Activity;
import android.os.Bundle;
import android.widget.TextView;

public class FirstAndroidAppActivity extends Activity {

/** Called when the activity is first created. */
@Override
public void onCreate(Bundle savedInstanceState) {
super.onCreate(savedInstanceState);
TextView text = new TextView(this);
text.setText("Hello Java Srilankan Support");
setContentView(R.layout.main);
}
}

Run as Android Application

You will see "Hello Java Srilankan Support" on the virtual device (AVD)


Run as Android Application


Android Virtual Device (AVD)


In home you will be see your FirstAndroidApp


Read more...

Wednesday, April 4, 2012

How To Setup Android Application Development Environment

29 comments
Android Development Environment in Eclipse

It is very easy to set up Android Development Environment on Eclipse. First of all you need to download the tools and software. You must download followings

  • Java SE Development Kite (JDK 5 or newer)
  • Eclipse IDE for Java Developer
  • Android Software Development Kit

Setup Java

To setup java in your computer you must download java from the oracle site here is the download link
http://www.oracle.com/technetwork/java/javase/downloads/index.html


Oracle Java Development kit JDK 7


Java SE Development Kite 7 and then select Accept License Agreement and select your windows platform also


Download Oracle Java


Oracle Java Development kit JDK 7


You are not require to do any changes when you are going to install JDK, just install it in normal way.


Setup Eclipse IDE

Download Eclipse IDE for Java Developer from the eclipse.org and extract the downloaded file.
Eclipse is not require to installation, just run the Eclipse.exe


Download Eclipse IDE for Java Developer


Setup Android Software Development Kit (SDK)

Download Android SDK from http://developer.android.com/sdk/index.html and extract the downloaded file and run the SDK Manager


Download Android Software Development kit


Install Android Software Development kit


  • Select Available packages from the left pane and then select any android sdk platform you wish to develop from the right pane, it will take time to complete.
  • Click Install Selected


Download Available Android Software Development kit packeges


  • In the popup select Accept All and Click Install


Install Available Android SDK packeges


Create Android Virtual Device (AVD) on Android SDK

After installation complete select Virtual Device in the left pane and then click NEW in right pane.


Create Android Virtual Device on Android SDK


  • Enter a name to your Android Virtual Device
  • Select target Android version from the Target drop down box
  • Give the size of SD card and then click Create AVD
  • It will take time to create Android Virtual Device (AVD)


Create New Android Virtual Device  on Android SDK


Configure Installed Android with Eclipse


Run the Eclipse ......

  • First run of Eclipse it will ask the default workplace, you must be mention the default workplace folder
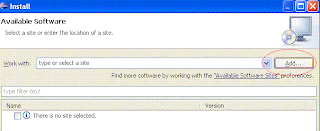
  • Go to the Help -- Install New Software

Add Android to Eclipse


  • Click Add button in install window to install Android Developer Tool

Add Android to Eclipse 2


  • Name it as Android
  • Add Location as http://dl-ssl.google.com/android/eclipse/ and do OK
Developer Tool of Android on Eclipse


  • After click OK, in the next popup box Select Developer Tools and click Next and accept license agreement and finish it


  • Eclipse IDE will gives you a warning message saying Your installation software that contains unsigned content ...... just OK and restart your Eclipse IDE

  • Eclipse Warning

Restart Eclipse


  • Now you need to give the Android SDK location to the popup which will be display when Eclipse IDE restart
  • When the Eclipse IDE starts there will be a configuration popup which will ask the Android SDK location
  • Select Use existing SDK and then browse the Android SDK location and finish
Add Android SDK location to Eclipse


Now your Android development Environment is ready for development. Start your First Android Application in Eclipse Hello world Android Example

Read more...